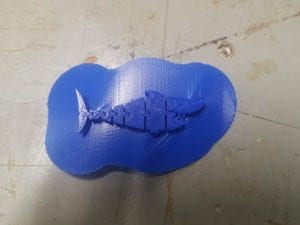
One of the two projects that we had due this time (the other being using a CNC machine) was to 3D print two copies of an “impossible” object, ie an object that would be impossible to create using any other manufacturing methods. I went on thingiverse and started scrolling through the top projects and saw a couple different variations of articulating animals and thought those were really cool so I looked up articulating animals specifically and found a file of an articulating shark that I found really cool so I decided to choose that as my project.

The next step was to change the scale of the object so that it would fit into the gumball machine capsule we were given. I measured the capsule and found that the largest dimension was roughly 5 cm so my scaled it down so that it would be 5 cm long. I then followed the directions on the OEDK website for using NETFABB to repair an STL file for printing so that there wouldn’t be any errors. My next step was to print!
Makerbar Printers:
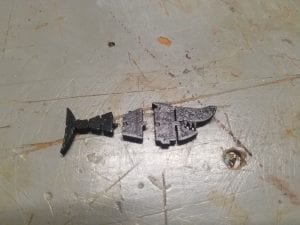
1st attempt: Unfortunately, the due date of this project was dangerously close to when many teams were working on senior design and other stuff for the upcoming design showcase so many of the printers were in use. When one of the Ultimakers finally opened up, I prepared my file with the help of one of the lab techs and set it to print. After 40 minutes, it was done but unfortunately, it had printed with a raft which completely fused the joints and meant that it couldn’t articulate.
2nd attempt: I had to run to class after the first one came out so I didn’t have time to try again but when I came back later, there was miraculously one of the Makergear M2 printers open. I again set up the file with a lab tech and made sure not to have a raft and tried again. The Makergear proved to be significantly faster than the Ultimaker, only taking 15 minutes for the same print. Unfortunately, while this one did not have a raft, the joints were still fused and when I tried to make it articulate, it broke and I would have to try again.
3rd attempt: After talking to a lab tech (shoutout to Nick Lester who will be showing up again in this blog post), I was told that it was most likely because the piece was simply too small to print articulated joints and that I would need to make it bigger. He also mentioned that since it does articulate, it could be significantly bigger than the 5 cm that I had measured as the biggest dimension so I sized it up to a little over 6 cm and tried again on the M2. It took around 20 mins this time and while it was better and had some bend, it didn’t fully articulate the way that it was supposed to. (I started forgetting to take pictures at this point on 🙁 )
4th attempt: I sized it up even more to around 7.5 cm and plugged it into the M2. This one took roughly 25 minutes and when it was finally done, I nervously scrapped it off and tried it and it worked! The shark articulated! Due to the resolution available on the M2, some of the detail on the face and teeth didn’t come out quite perfect but it still held up and was very clearly a shark so I called that a win and moved on. I did use some needle-nose pliers to take off some small bits of plastic that had gotten parts of the top but other than that, there was not much post-processing necessary.
Wet Lab Printers:
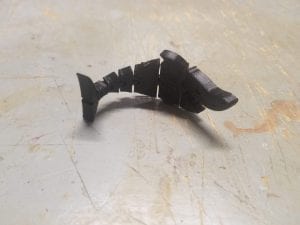
1st attempt: Apparently the Objet has been having some serious issues and won’t be up and running for a while so I was left with just the Fortus. This was at around the same time as attempt number 3 for the Makerbar printers so I had my file set for around 6 cm when I wrangled a lab tech to help in the last few minutes of their shift. I set the print up and since no lab techs were on shift anymore, I had to come back later to move it to the lye bath. Eventually, I got it moved (thanks to help from the aforementioned Nick) and now it was simply a waiting game. The next day, I came back and when I got the shark out of the lye solution, the lab tech who was helping me said that articulated pieces rarely work coming from the Fortus and she was proved right, the joints had fused.
2nd attempt: So the Objet wasn’t available and I had just been told that the Fortus probably wouldn’t work so I felt like I was left with no options. This is when someone suggested the Markforged. I wasn’t sure whether the Markforged counted as a “commercial printer” as stated in the project sheet but when I asked Adulfo, he said that he thought it would count since it charges the design team the same way that the Fortus and the Objet do plus the fact that up until just a few weeks prior, it had been in the wet lab. With that reassurance, I went to go use the Markforged. Since the Markforged is lab tech use only, Nick was available and able to get me set up in the queue. Unfortunately, there was also someone else in the queue in front of me so by the time that came around, the next shift of lab techs would have taken over. Nick set me up in queue and left a note for the next shift to get my print started with that plan in place, I felt fairly confident that I would have a working piece soon so I left. I went and got dinner and came back to check on the piece after a few hours. When I came back, I found that there was a completely different piece printing that still had 2 hours left! I talked to the lab techs on duty and although they found the note when I asked them about it, it seems that they had not seen it originally so someone had jumped in front of me in line. To make matters worse, by the time that piece was done, all of the lab techs would be gone so there would be no one to get my print started. I went back to the 210 table and did other work while waiting for the print to be done and considering my options. While I was thinking that I would have to come back the next morning, like an angel sent from above, Nick came back and despite not being on shift said that he had swung by earlier and saw that someone had jumped me in line and came back to get my print started when they were done. I thanked him and he set up my print and pressed start. The estimated print time was an hour and 10 minutes so I went back to the table to finish up my blog post for the CNC project. After about 10 minutes, I went to check on the Markforged and found that somehow, in the last 10 minutes my print had been cancelled and someone had slapped an “Out of Commission” sign on the Markforged. I was baffled. Luckily for me, Nick had stayed around to do some other work and I was able to get him to help me figure out the problem. After poking around, we found that the filament had gotten jammed and wouldn’t print anything.
3rd attempt: After basically everything that could go wrong had went wrong, we sat there considering our options. Since although the Fortus wasn’t great at articulating prints, it was capable of it, Nick suggested that we give it another try at the larger size. Again, despite it not being anywhere near his shift, he helped me get set up in the wet lab and got my print started on the Fortus. It was only a 40 minute print and once it was done, we moved it into the lye bath. It only needed a few hours in there due to the small and relatively support-less structure and when we pulled it out, it worked! Again, it wasn’t perfect and some of the joints weren’t super smooth and some of the face details were lost, but it still worked and that was enough to make me happy.

Cost Analysis:
Raw Materials Cost:
Makerbar: ~ $2.00 for all attempts
Fortus: $13.92 for both attempts
Total raw materials cost: $15.92
Labor Cost:
Me: 3 hours (not including waiting time)
Various lab techs (esp Nick): 2 hours (not including waiting time)
Minimum wage in Texas: $7.25 (I’m fairly sure lab techs get paid above min wage but I’m not sure how much so I am just using this as the lowest estimate)
5 * 7.25 = $36.25
Total labor cost: $36.25
Machine Cost:
Monthly membership to makerspace with various 3D printers: $50
Total machine cost: $50
Total cost: $102.17
