These past two weeks, I have learned how to create a mold utilizing alginate and plaster!
I have never molded anything up until this point, and my only experience with alginate up until this point was getting a retainer. So I decided to go with the beginner assignment of molding a finger!
Learning how to make a mold!
In class, we created our first finger mold, using alginate and plaster made by the TAs. The experience was extremely helpful with learning how to set the alginate and prepare our screws to set in the plaster. I was very excited to get my little finger. Yay!

However, the next day, when I tried to get out my finger, I came a day later, which allowed for the plaster to get too moist, resulting in my finger crumpling to pieces. 🙁
Attempt 2/3? – MAKING THE MOLD AGAIN!
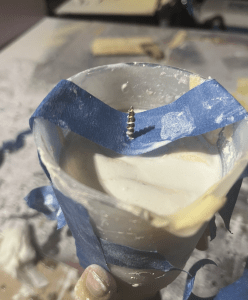
I made another mold again, being sure to use water and alginate (4:1 ratio by weight) using a large batch my classmates and I made. This time I followed their idea of smacking the alginate before sticking my finger in, and then poured in plaster powder mixed with water (2:1 ratio by weight).

I came in the next day, 12 hours later, and tried jiggling my plaster finger out. I was too forceful though, and ended up breaking the finger :(.

The mold was still intact though, so I decided to repour some plaster into the mold to try making another finger again. This time I also set an alarm for me to wake up 12 hours later, so I’d remove my finger.
I then came in the next day, still over 12 hours later (I did not wake up to this alarm :[ ), and decided to copy the crisscross cutting of the soap molds in class to cut out my finger in the mold. More of the finger was able to come out this time, but once again it was too wet, so a small piece broke off. I should have come sooner once again to free my finger as the plaster absorbed the moisture of the alginate.

Attempt 4 – making the mold…again!
I was hoping that third time would be the charm. At this point a TA recommended it’d be better to mold two fingers at a time rather than one so if one came out poorly, I’d have a second mold I could use to make another finger. If they both came out well, then I wouldn’t have to re-pour plaster in a mold. Plus, I’d be able to waste less material this way. So I followed their advice!
I mixed water and alginate (4:1 ratio by weight once again), and this time took some advice from Mina to instead mix the plaster to a 3:1 ratio by volume so that the plaster would be less wet when it would dry. I also was sure to hit the plaster against the table to remove any air bubbles trapped inside.
When the plaster finished curing, I decided to carve out the molds using a box cutter instead of trying to jiggle them out, as the previous two times went poorly. This ended up working out great as this time my fingers came out in one piece!

The only downside was that there were a lot of air bubbles. I figured that this must have been a result from using very thick plaster which made it harder for the air bubbles to come out, in addition to me not slamming the mold hard enough. 🙁 Next time, I will try to stick with the original plaster ratio, and be sure to slam the mold downwards with more force!

Post-processing!
Luckily, most of these air bubbles were small enough that the spray paint would fill them up, but the larger ones I decided to fill with some extra plaster that another classmate had left. I was sure to pat down the plaster with my finger so that it’d mimic the texture of my finger.

I also noticed that the ends of my nails chipped because of how thin they were. So, I decided to grab some high-grit sandpaper, and sand off the edges to make them smoother. This was when I also noticed that the plaster at the end of my finger wasn’t entirely straight as my screws shifted in place as the plaster was drying, so I sanded it as well so that it’d be more flush with the wall when screwed in. Next time, I’ll be sure to hold my screws in place using masking tape to ensure that they remain horizontal within the finger molds.

ADDING STRIPES!
I then decided to spray paint black and yellow stripes to make my fingers look like bees. I used masking tape strips cut in half and wrapped them around the fingers. I then spray-painted yellow first and allowed the spray paint to dry. I covered the yellow spray paint using masking tape, and then spray-painted the finger with black. After allowing the black paint to dry, I proceeded to remove the remaining masking tape, so I could finally seal the paint with a clear coat. I am a bit unhappy with how uneven the stripes are, but I learned that I should use a ruler to ensure that the spacing between each stripe is consistent, rather than eyeballing it.


Unfortunately, it was at this moment I realized the masking tape lifted some of the spray paint, leaving patches of plaster exposed 🙁 . To remedy this, I took a paint brush and painted on some spray paint onto these patches. Next time I will try to stick the masking tape onto some fabric or cardboard before sticking it into the plaster so there’d be less adhesive that could remove the paint. I will also be sure to apply a clear coat onto the yellow paint to protect it from the masking tape’s adhesive.

After waiting for the spray paint to dry, I then applied a clear coat onto the fingers to protect the paint job.


Next time I create something using a mold, I’ll be sure to be more careful when getting rid of air bubbles in the material I pour in, be more efficient with material usage, and be more aware of my materials properties (ex. plaster absorbing alginate’s moisture, and the adhesive of the masking tape taking off the spray paint).
COST ESTIMATE:
- Alginate (Dick Blick Make-a-Mold Alginate $32.99 per 4.5 lbs) Used 1 lb: $7.33
- Plaster (Plaster of Paris $15 per 8 lbs) Used 8 oz: $0.94
- Black Spray Paint (Rust-Oleum $6.48 per 12 oz can at Home Depot) Used 0.5 oz: $0.27
- Yellow Spray Paint(Rust-Oleum $6.48 per 12 oz can at Home Depot) Used 0.5 oz: $0.27
- Clear Coat (Rust-Oleum $6.48 per 12 oz can at Home Depot) Used 0.5 oz: $0.27
- Labor ($15 an hour) 3 hours in total: $45
Total: $54.08
