A Quick Preview
Here is a sneak peak at the finished product! For the wild rollercoaster that was creating this bad boy, please read on!

 And to see this bad boy in action, check out the movie here!
A SPARK OF INSPIRATION
Wow has a LOT happened since I’ve last been around. I’m just going to dive right in this time, so buckle up and get ready for a wild ride.
I was tasked with making a working mechanical model based on one of the movements from 507 Movements, but the end result could look like anything. That was a lot of freedom, so I took it and ran straight to the cute cat photos. I found this great kitten butt wriggle and pounce and decided this was it for me folks. My primary motions needed to somehow (1) move the cat’s back side to side and (2) move the whole cat forward and then backward to reset


I’ve literally watched this loop for hours. I’d leave it running while working on my project.
And I found the perfect mechanical movements to do this: Movements 131 and 276. On to actually planning this bad boy out.
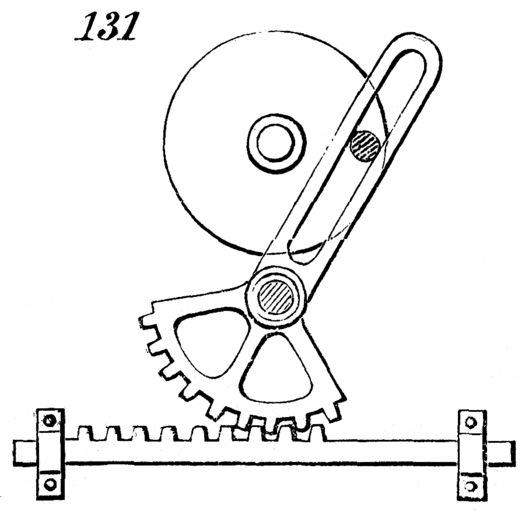
The pinion pushes the rack forwards fast then resets slowly, perfect for a pouncing cat.

The cam causes the bar to move side to side in a fairly constant motion, perfect for a little butt wiggling.
STARTING WITH A SKETCH (HERE WE GO AGAIN)
I know, I had to start with a little research this time around. But now here is the infamous sketches! First, I was going to need some gears. Rather than use a gear generator, I decided to do things the hard way by drawing out my own involute gears. Fun thing I learned: the reason involute gears are so popular is because they always apply the same pressure to the gear next to them while they are turning. If you want to do some math and draw your own involute gears, check out this video here.

Drawing gears #1. On the left is the curve of a single tooth, on the right is the valley, and on the bottom is the rack for my rack and pinion.
Next was to put my new gears onto an actual board. The green rails would move the back of the cat side to side while allowing for that forward pouncing motion!

Full drawing #1
GEARS THAT BREAK UP THEN KISS AND MAKE UP
I know, we’re moving crazy fast! You’d think this project is almost done right? Not quite. I cut my vector shapes out of cardboard to test out my idea. Unfortunately, having the pouncing and butt wriggling happening at the same time tended to lock up the mechanism. Plus, my rails were way too thin and needed some beefing up.

Full prototype #1
To avoid locking up, I needed a way for the cam motion to happen and then the rack and pinion motion. Doing this would also provide a more accurate representation of my inspiration cat GIF. So I devised a way to turn certain gears on and off: a half gear!

Katy Perry Gears #1. Because the gear only has half of its teeth, it can only turn one of the two smaller gears at a time.
However, the involute teeth kept catching when the large gear went to reengage a smaller gear. Even cutting off half the tooth on the smaller gear didn’t really help. The teeth just had too many sharp corners. So it was time to throw out all that working drawing involute gears and draw some circle-toothed gears instead.

Drawing Gears #2. At least this method was a bit faster and a lot less complicated.
Because of the lack of sharp corners, this system worked much better. Here is it’s prototype:

Katy Perry gears #2.
This system still had a few kinks. If I spun the large gear too fast, the smaller gears would overshoot where they were supposed to stop, causing a lock up during the next engagement. But they worked 90% of the time, so I decided to use them.
CONTINUING WITH A SKETCH?
This is when the iterative nature of prototyping starts to really kick in. I had to completely redraw my entire plan. I had to make space for my half gear to fit between the cam and pinion, and of course I needed to add in my new circle-teeth gears.

Full drawing #2 with new gears, a beefier rail system, and a sleeker base.
Plus, I hadn’t actually designed the cam the first time around. I just used a triangle as a place holder. So that also needed to be added in.

Designing a cam that has the same diameter through the center regardless of rotation. You can see the cam in the drawing above.
RINSE AND REPEAT AND CRY AND RINSE AND REPEAT
Here come’s the rollercoaster my friends.
So I did another low fidelity prototype with my new drawing.

Full prototype #2
And I realized (1) the rail system wasn’t actually connected to anything and had no stability, (2) the cam system was not going to push the bar the way I wanted and was more likely going to just get stuck, and (3) I hated the way visually the cat was going to be all the way on the right. This girl wanted some symmetry.
So I completely dropped my original two motions and turned to Motion 92.
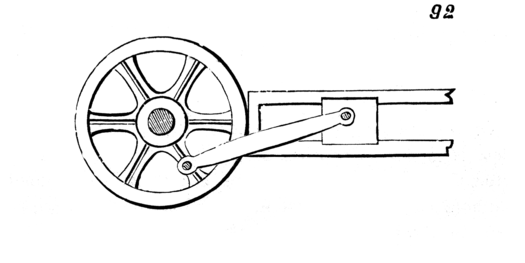
The crank pushes the slider along the rail then pulls it back again.
I was going to use it both for the butt wriggle and for the pounce (same thing rotated 90 degrees right?). For fun, I threw in an extra rotating gear that I could put a ball of yarn or a mouse on. Here was the resulting drawing.

Full Drawing #3
Then I moved onto a wood prototype (cardboard gears just couldn’t give me enough information about functionality anymore). Except I struggled to find a way of linking the bottom gears to the top gears. First, I tried a rubber band wrapped around smooth circles (I was thinking along the lines of a bike chain). But the rubber band just slipped and didn’t actually turn the driven gear. Then I tried adding two small gears with a long connecting bar (this is the version shown in the drawing). But the gears were too small, so the connecting bar couldn’t really drive the driven gear. Finally, I tried a row of small gears. Except they were 2.5″ in pitch diameter, and the distance I had was not a multiple of 2.5. I gave 2.507 in between centers figuring it would be close enough. It was not. The small gears still kept locking up.
Separate from the front/back debacle was the axel debacle. I attempted to glue 0.25″ circles of plywood together to create a kind of dowel. Except 0.25″ is way too small, so my wood kept splitting. I figured maybe if I used an actual dowel and glued it into a hole in the board rather than just on the surface, it would be stronger. So I jogged the laser cutter, cut out a corner from a piece of scrap, and lined up my board with my template. It still wasn’t accurate enough. My main gears at the top (which actually worked pretty well before) now didn’t work at all.

Full prototype #3
At this point, it’s late Monday night, I’m supposed to have class Tuesday morning, work all Tuesday afternoon, and turn this in by Wednesday at noon. I am not doing well and I start making poor choices. I decide I need to abandon the butt wriggle and get just the pounce to work. This should make things a lot easier on me. Except I bring back the rack and pinion, which didn’t work as well as the crank motion, and I still keep my axels at 0.25″ but I make them all only one board high with one exception of two boards high (Full prototype #3 had axels up to four boards).
Commence another round of drawing …

Full Drawing #4
and prototyping …

Full Prototype #4
So one of my axels snaps (because of course it does; I made them too small), I throw the pieces I’m holding down onto the table, I grab my bag, I walk straight out of the OEDK in tears, and I basically have a mental breakdown in my dorm room. That was a wrap for Monday night.
Tuesday, I tell my job I can’t make my shift, and I work from 8am to 10pm with an hour for a class I did on Zoom in the OEDK and an hour for dinner. I skipped lunch. I do yet another drawing, this time with just the pouncing generated by the crank motion.

Full Drawing #5
And low and behold, my prototype works. Hallelujah. I keep most of my wood pieces, water jet cut the crank bar, and start working on the aesthetics. I draw up both the cat and the mouse for laser cutting as well as some calico spots for vinyl cutting. I drew the cat myself but I borrowed the mouse from The Noun Project.

Cat with Stickers and Mouse
Here is the cat! Both the cat and mouse were polished with tung oil, and the floating floor was stained with a mix of stain and tung oil. Then of course I added the stickers which was a mix of using the vinyl cutter and winging it with a pair of scissors.

Check out those calico spots!
I’m super excited for the cat’s tail because it can move a little bit as a result of the one-degree hinge I added.


Me moving the cat’s tail around.
Finally, I needed to add a handle for the user to … well, use. My initial idea was to use a dowel.

Turning mechanism #1
Except this made the user put too much of their force outward. For the smoothest motion, that circle needed to be pressed down and turned with preferably multiple fingers. So I sawed off the dowel with a pull saw and added a cheese knob instead. Interestingly enough, both Adulfo and Dr. Wettergreen had this idea independently. This worked much better.

Turning Mechanism #2
AND WE’re done!!!
Oh my goodness, that’s it! It’s finally done! And here she is in all her glory:
And if you want to see this bad boy in action, check out the movie here!
As for the cost, I have lost all track of time and don’t know how to count the 60+ hours I spent on this or how to calculate the cost of cardboard I pulled out of the recycling bin. So I’m only doing the time it took me to make the final product.

And that’s it guys! I’ll catch you next time where I might just be adding another dimension to my currently two dimensional repertoire . . .
