Throughout my childhood, I only observed a sewing machine being utilized by my best friend sewing clothes for her dolls. Other than that, only my mother and surrogate grandmother implemented the act of sewing with a needle and thread. I found myself sewing my first stitches in college when my jeans with holes gained holes I did not pay for. When I heard that sewing would be taught in ENGI 210, I immediately became interested since it is not what I considered to be a normal skill to possess when implementing projects in Engineering. However, now I can understand more how many industrial-like products came from businesses starting with a sewing machine and a motivated entrepreneur because of this invention. I soon determined that it would be a challenge I want to conquer.
Step 1: Determining the fit
I wanted to deal with a more accurate representation of my size rather than the measurements given to us in class; therefore, I constructed an apron that would be 32 inches in height and 24 inches in width after the sides are folded and sewed. In order to ensure this occurred correctly, I measured with a ruler and tape measure.
Step 2: Sewing the folds and trying to make it look not like a 5-year old hemmed it
My first struggle of sewing was to make the thread stay in a straight line to give it a better finished look. However, some of the fabric was not folded all the way so the thread did not pin it down, and so that is why I wanted to hem my apron with two lines on each side. In addition, I wanted to create a product that did not have frays, and that is why I double folded it in the beginning and continued the process throughout my many hours of creation. It was actually very relaxing and enjoyable to sew the fabric into the shape I wanted, which surprised me tremendously. It took me a bit of time, though, to understand how to use the machine and the reverse button to ensure that the threads won’t come undone easily, especially in a washer. The worst part was when the needle broke on me TWICE (I promise it never went into the machine), but it taught me how to unload and load a needle into the sewing machine from a YouTube video.

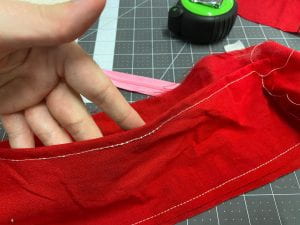
My pinning and hemming process for all of the apron sides:)
The sides turned out better than I expected and I am super proud of the finished hemming on the sides. The only problem was that I wanted to make sure the height was truly what I wanted, so I never hemmed the bottom until I decided the length of my straps and where the apron would start and end on me.

The hemming all pretty;)

Clearly seeing the straight lines in my hemming;)
One of the best parts of sewing, however, was how many people I actually got to know from each class during some of the late night sewing sessions. It was really nice getting to know people in a way I never expected and sharing ideas/laughs (especially when it’s after class and I’m waving goodbye to the professor knowing that I will be here awhile…).

Making friends!! (Peep Dr. Wettergreen in the back)
Step 3: Deciding on if I really want to spend time creating my own straps or if I want to use the really skinny ones (spoiler: I spent way too much time creating some)
So, as the step indicates, I created my own straps, which proved to be somewhat fun and stressful at the same time. This was the time I decided I wanted to be TOO precise and started measuring each flap to ensure it was a certain distance, such as 2 centimeters (crazy, I know). Then, I folded everything, sewed the folds, and then folded it once more for a more professional look as I wanted it to be a thicker strap (the reason why I chose to create my own, actually). As I contemplated on my life and why I willingly choose to make it harder, the relaxation of sewing helped keep me concentrated (as well as the heavy metal music played by the OEDK Spotify…I’m not hating on it, but I actually got into it). The box stitch was actually somewhat difficult for me to implement since I really wanted the lines of the stitching to be parallel to the stitches already in my apron for the hemming, but I could not get it lined up, so that was a failure I ran into:(

Me and my lovely strap:)

Ready to become attached to my apron.

Box stitch ready:)

Ummm…box stitch completed?

Neck strap presentation:)

The whole shebang!
Step 4: Finally became a decisive person and hemmed the bottom part of my apron
I decided to take a stand and become decisive (for once) and hem it to the height I want (with the help of some advice from people around the OEDK because I have no idea what an apron is supposed to look like on a person…). It actually turned into a length that I am comfortable with and looks good!

Beauty at its finest:)
Step 5: Debating if I should add on a pocket or not because I am technically done but I have more time (dang me for being ahead of schedule)
After I became finished with the beginner portion of the assignment, I realized it is Thursday and became aware that this assignment is due Monday (at the moment it was). Therefore, I knew I had more time to incorporate any more creative thoughts I had into actual designs for my apron. However, the implementation was where I somewhat struggled because I practiced on a piece of scrap fabric and created a pocket first, which looked very good. I proceeded to want to be too ambitious and sew on a zipper because I was really thinking that it would not be as hard as it looked. I learned that indeed, like many times and about many things, I was wrong. I sewed the actual zipper shut because I did not separate fabrics and proceeded to have a zipper that only rivals to women’s jean pockets (truly, they sometimes cannot fit a stick of gum). After thinking about it logically instead of just going in and doing it, I figured out a good way to incorporate the zipper and still ended up deciding against it (decisions;)).
Look at that pocket of air!

Sewed shut…
Step 6: Decisive Tori hits again and decides to go through with the pocket idea (and it actually looks decent!)
After contemplating it for around 3 days, I finally decided to make two pockets, one for items such as my phone and another for pencils (or spoons, courtesy of conversations from the OEDK). I wanted to keep a color scheme of red and blue while creating pockets, so I designed a red pocket with blue overlay to really hit the correct color points. Both hit me at the spots I wanted and I became super happy with my decision:)

The pinning of the pocket:)

Both pockets strapped on and ready to go!
Step 7: Sparkle Baby! Posing time;)
With being done, of course I have to pose! After having help from students for taking my picture (shoutout to Alois’ awesome camera) and the self-timer on Snapchat, I get to show off my apron and design:) be ready for the splurge of beauty!

My apron in all its glory!

Look from the back!
Step 8: Determining if it was actually worth it to spend all this time on the apron…
I’m not a professional sewer. Saying this, I am aware that my work would be considered below average in comparison to actual tailors around the area. Therefore, I can conclude that my hourly rate would be around $13-$15 (not very high) according to this salary website (link below). Since I put around 10 hours into this apron (lots of practice and ensuring it looks decent), then labor cost would be around $140. Looking at my dimensions above, I would pay for around a yard of fabric and that would be around $6 from Joann’s. Then, all I need to worry about would be the thread price and that would be around $1.50 for all the thread I need. The OEDK would be my place of business as then I would not have to pay for sewing machine costs at all and could be there 24/7. Therefore, my total cost of the apron would be ($140+$6+1.50)=$147.5. Honestly, I am not entirely sure if this would be a good apron to sell, so I might have gone into the hole $147.5, but it was fun!
Salary: https://www.salary.com/research/salary/benchmark/sewing-machine-operator-hourly-wages
Fabric Price: https://www.joann.com/fabric/?prefn1=isSale&prefv1=true&icn=fabric-sc&ici=shop-sale
Thread Price: https://www.joann.com/gutermann-sew-all-polyester-thread-110-yards-greens/2275311.html?gclid=CjwKCAjwvNaYBhA3EiwACgndgu6ltWUtGqxVOTT7ku-vHTx2RLtrchRSO2yX8I5jdbQw5I5sxUTXCRoCo-sQAvD_BwE
It was super fun and enjoyable! 10/10 would do this assignment again (maybe with a bit more experience on the sewing machine:))
