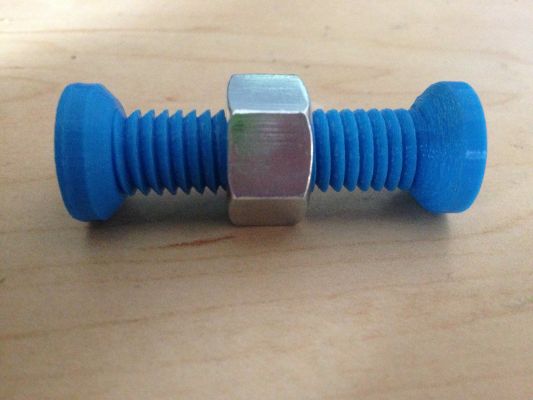
For this project we were challenged to 3D print five of an impossible object, defined as something that would be at least extremely difficult, if not impossible to produce without the aid of 3D printing techniques. After a brief search of the internet for ideas, I opted to produce the impossible bolt, seen below:

This bolt with a nut trapped between two large ends is typically used in magic tricks, i.e. is produced with a trick in mind to get the nut on and off. However, with 3D printing it is actually possible to produce an impossible bolt such that you cannot remove the nut from either end once it is complete.
Although not required, I opted to create the AutoCAD files for the bolt and nut on my own, to practice my skills in Solidworks. I began by creating the bolt, a rendering of which can be seen below. I used a 10 degree draft angle on the top and bottom so that I would not need to insert support material when it was time to print. For the threads, I used the Metric 20×1.5 preset, and increased the pitch to ensure that the threads were able to print cleanly.

Even with these alterations, I wanted to make sure the Prusa printers would be able to correctly print the threads before I moved onto perfecting the fit of the nut. I printed a test copy of the bolt below on the Prusa FDM printers with a layer thickness of 0.1 mm. It turned out great:

Next up was to design the nut. I didn’t want to completely model it from scratch in Solidworks, so I downloaded a dwg file from McMaster-Carr and changed the thread specs and internal diameter. I then printed another test bolt, this time with one of the drafted ends removed so that I could test the fits. The first time, I did not properly add tolerance to the internal diameter of the bolt to ensure a clean fit. I also found that the bolt was comically thick. The second time around, after increasing the nut internal diameter by 0.2 inches and decreasing the nut height, the threads fit perfectly.

First nut iteration (improper tolerance and very large) compared with the second iteration.

The nut properly fitting onto the test bolt.
It was now time to print the five nuts I would use for the final products. As this project required the use of two different types of 3D printing, I decided to use the Makerbot Method X ABS printer for the nuts. The print came out very well, but with a ton of white support material that had been generated during the print:

I placed the print into the lye bath and left it soaking for >24 hours. When I pulled it out the next day, all support material had fully dissolved and the nuts looked like this:

After thoroughly rinsing them with water, there was one more step. I started the final print with all five bolts. About 90 minutes later, I returned to the OEDK and paused the print. I then carefully threaded a nut onto each of the bolt stubs, ensuring that there was enough thread printed already that they would not get in the way of the rest of the print:

The nuts placed onto the incomplete bolts while on the Prusa printer.
With that, I returned two hours later and the impossible bolts were complete! They all turned out great, with the nuts able to move up and down cleanly but unable to be removed from the bolt.

3D printing projects always require a lot of time management, as prints take many hours and there’s never any guarantee they will turn out well. Luckily I was able to complete this one before beer bike!
Cost Estimate:
PLA: ~$15-20/kg, estimated $2 needed for this project
ABS: ~$35/kg, estimated $3.5 needed for this project
Printer Time: About 8 hours total at about $1 per hour: $8
Labor: About 2.5 hours at $15/hr: $37.5
TOTAL: $51.5
