For our final project, I worked with Sing, Wen-Yi, and Antonija to create the LUCIA pelvic frame. This structure contains and presents the cervical models that we 3D printed, molded, and cast months ago. Together, these components are designed to display the cervix models in a user-friendly and clinically relevant way. For this phase of the project, we needed to create the outer casing, the inner structural components, and the cervix model holders.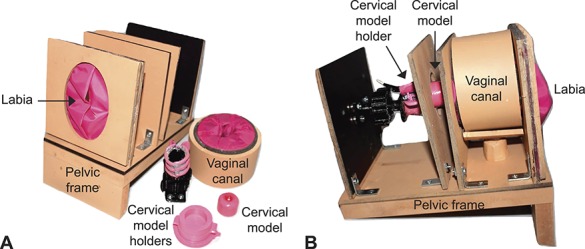

DOI: 10.1097/AOG.0000000000003140
MEASURING DIMENSIONS FROM THE ORIGINAL MODEL FOR REPLICATION
We began by noting the shapes and measuring the dimensions of the different parts of the LUCIA pelvic frame using a caliper and ruler. We then used these shapes and dimensions to create designs in the appropriate software, keeping in mind the file formats required to be compatible with the machines we would use to fabricate the parts.
WOODEN COMPONENTS
Since the outer casings and inner structural components were to be cut using the laser cutter, we designed them in Adobe Illustrator, as .AI files are required for the laser cutter. We set all stroke widths to 0.072 pts, as we weren’t doing any engraving—only cutouts. To make our structure more sturdy, we laser-cut multiple copies of the same wooden parts and superglued them together to create thicker walls.

Little did we know, this would be the easy part. When we started cutting our wooden pieces, we spent at least an hour testing different settings, as the laser appeared to have some damage and required multiple passes to cut through the wood. Slowing down the laser improved the cutting depth but caused the wood to char. After testing various speed and power combinations, we found that doing four passes at 13P, 100S, 100F gave us the results we needed.


This approach worked—until we ran out of that wood and had to switch to another type, which happened to be thicker. With the new wood, the laser cutter couldn’t cut through even after six passes. To solve this, we sanded the opposite side of the wood until we reached the cut depth. This caused some breakage when removing pieces from the larger sheet, but we smoothed the edges with sanding, and at last, we had our final wooden cutouts.

L-BRACKETS
Our L-brackets were designed in AutoCAD and saved as STL files to be uploaded into Bambu Studio. We chose to 3D print these parts because suitable metal L-brackets weren’t available at the OEDK, and we didn’t have time to order the ones we needed. Printing properly sized brackets took two iterations: our original design used 4 mm diameter holes for the screws, but the screws didn’t fit. We adjusted the holes to 5 mm, and that worked great! With the design optimized, we printed seven brackets as needed for our model.


CERVIX MODEL HOLDERS & SUPPORTS
We also chose to 3D print the cervix model holder and its support, as this was the simplest and most efficient approach. Initially, we had planned to replicate the real model, which used a strapped compartment to hold the cervical models. However, we felt that the straps—intended to be adjustable for slightly varying cervix model sizes—could be replaced with a more solid and controllable mechanism. So, we searched online for an adjustable screw mount that could be tightened to fit the model as needed. Luckily, we found exactly what we were looking for—and in the right size! To design a compatible support, we measured the height at which we wanted the model to be suspended, the depth it should sit within the outer casing, and the width needed to stabilize the structural rods connecting to the model holders.


ASSEMBLY
With our wooden cutouts and 3D-printed parts ready, we began assembly using L-brackets and screws to piece the parts together. We tested several screw types and chose butterfly-shaped ones for their ease of use. Once everything was assembled, we realized that the plastic L-brackets limited the rigidity of our design due to the flexible nature of the material. However, we couldn’t address this at that stage, and we avoided supergluing parts of the outer casing to preserve the model’s modularity for easy assembly and disassembly.


Our final step was supergluing the cervix model holder in place. Since we had only printed the shapes themselves—without guides to show how they should be positioned—assembly required some manual alignment and estimation. While this was manageable for us as the creators, we realized that if others were to assemble it, future iterations should include notches or alignment features to guide correct placement.


Finally, for post-processing and finishing, we sanded the edges to provide a smooth finish, making the LUCIA model more pleasant to use. Overall, I really enjoyed the process of bringing together different parts to create a functional product. It gave me insight into how different manufacturing techniques can be integrated to shape a user experience.

COST ANALYSIS MODEL
| Cost Type | Cost | Price | Source | Quantity | Total |
| Materials | PLA filament | $19.99 / kg | Bambu Lab | 19.82g | $0.3962 |
| Screws | $6.89 / 200 pieces | Hillsflatlumber.com | 44 pieces | $1.5158 | |
| Wood Board | $1.33/ piece | Amazon.com | 3 pieces | $3.99 | |
| Wood Glue | $0.8675 / oz | Walmart.com | 1 oz | $0.8675 | |
| Superglue | $0.37/ count | Amazon.com | 1 count | $0.37 | |
| Labor | Prototyping Engineer (Intern) | $17 / hour | ZipRecruiter.com | 10 hours | $170 |
| Overhead | Bambu 3D printer (rental price) | $19 / day | Fatllama.com | 3 hours | $2.375 |
| Laser cutter (rental price) | $10 / hour | University of Irvine | 2.5 hours | $25 | |
| Sanding paper | $ 0.007 / cm2 | The Home Depot | 160 cm2 | $1.12 | |
| Orbital Sander | $ 13 / 4 hrs | Home Depot.com | 20 minutes | $1.08 | |
| Quality control | $27.5 / hour | LinkedIn.com | 0.5 hr | $13.75 | |
| Design | Engineering and Development | $17 / hour | ZipRecruiter.com | 4 hours | $68 |
| Misc. | Waste and Scrap | $0.17/L | Houstontx.gov | 0.2L | $0.034 |
Sum: $288.5
