For this project, I worked alone to produce a laser-cut box. While I had some laser-cutting experience in the past due to taking ENGI 120/FWIS 188, this project was a much deeper application to do on myself. Overall, I felt that the end product was very neat, and I found it helpful to experience cutting with the laser cutter.
PHASE 1: Designing the box
To begin the project, I used the recommended MakerCase website to create a box design and download the files. I set the dimensions of the box to have a width and height of 4 inches, and a depth of 6 inches to create a rectangular prism. This design of shape was based around the plan to create rasters of an image that would require a longer space. The material thickness was set at 0.20 inches to reflect stock thickness, and finger size were set at 0.625 as having 3 fingers looked more uniform to me, and it would provide the box with more supports on each side. For the first iteration of the box, I set the kerf size to 0.014 as recommended in the homework document.

Box design on MakerCase
The next step was to work in Adobe illustrator for the design of the box. My idea was to raster images of iconic iterations of the Porsche 917 race car alongside the Porsche crest and the required text information. I wanted this so if the project is returned to me, I could place it on my shelf next to my model cars of the same vehicle.

Design in Adobe Illustrator
PHASE 2: Test cuts with the laser cutter
With the files ready, it was time to test cuts with the Epilog Fusion Pro cutter. To begin, I felt that to would help to get a full picture of who the engraving and the box would be cut out. As such, I used some available scrap to cut out a test box. It was here where a lot of issues began to arise in regards to how files transferred from Adobe Illustrate to the Epilog Fusion Pro printing software. My file was not properly seperated by colors when imported into the printing software, and rather as a whole piece of both the engravings and what was supposed to be the vector cutting for the box sides. After talking with a Lab Assistant, they noted that this was a persistent issue with some people, so their solution was to engrave first, save the coordinates of the placement, and the use those coordinates to place the part again without the engraving to do the vector cuts. As such, this was the process I would have to use for the whole project as, spoiler alert, the issue persisted the entire time I worked with the Epilog Fusion Pro.
For the first cut, the set-up for engraving used was 30% power and 20% speed as following an image engraving help piece in the laser cutting room. For vector cutting, 18% at 100% power was used.

Set-up of the first cut
Video of the Test Box Vector Cut
When the box was cut, the issue that was noticed was that the box did not press-fit as required by the project. As such, it was time to look into the issue. My gut feeling was that the kerf was too large for the box, but it was also theorized by a Lab Assistant that it could have been an issue of width difference between the stock and box design (the stock was noted as thinner than the box design). It would have to take another test cut to note what the issue was.
Of note as well was that for my liking, the engrave settings were too dark for the vehicle images. A lot of detail was lost in the shadows, so a different setting to achieve a lighter engrave would have to be used.
Shape of box and result of engrave settings
When working with the next test cut, a student recommended me that the kerf of 0.005 had been working for others, so for a new test box, that setting was used. To change engrave settings for the vehicles, 60% speed at 30% power was used, as per the guide available in the Laser Cutter Room. To vector cut, I was recommended by Zion to use around 15%-16% power in order to assure that the pieces of the box would cut fully through the stock, which I took the advice of and used 16% speed at 100% for the vector.
The resulting box had better kerfs that allowed for a higher fitting of the box, though it was weirdly inconsistent depending on the sides, as some managed to be press-fitted, while others needed the assistance of a mallet. However, the resulting box required no adhesives to be assembled, so I would keep the setting of the kerf at 0.005.

Assembled test box
Taking note on the settings for the engrave, I thought that it was still too dark for most details to be seen in the shadows, so a lighter setting would have to be used. To assure this, I performed a test engrave to see how a particular setting would work. For the test, the same guide was used, and in debating between 10% or 20% power, I decided on 15% power with 80% to have a lighter, but still dark enough etch to give the vehicles form.

Test engrave settings
The results were very acceptable, and so I decided to keep those settings for the final cut.

Test engrave results
PHASE 3: Final Box…until it was not
This section showcases the importance of being very careful to double-check settings, as one little mistake can result in a lot of time lost.
With all the information of the test, I was ready to cut out my final box. I proceeded as usually, still dealing with the issue of having to engrave first and vector second. However, during the engrave, the edges of the box were being engraved alongside the vehicle, emblem, and text. This was odd as it did not happen all previous times, but I did not think much of it as it would not really affect how the box would look drastically when vector cut. I attempted to use masking tape to minimize burn marks, but the laser did not cut when running with masking tape, even after autofocusing. I decided that I would have to make due without it as no resolution was found for the issue.
When I began vector cutting, I noticed a major issue in that the laser was cutting multiple times through each side. After stopping the cutter, I noticed that the stroke setting was at 7.2 pt and not 0.072 pt. This one oversight resulted in the project completion being pushed back one whole day. An overall unnecessary loss of time and material.

Engraved edges and wrong stroke setting result
PHASE 4: True Final box
With all of the mistakes learned and all the knowledge of the tests, I returned for one last time to cut the final box. Last edits were made to the box design to have a preferable layout of the vehicles for the final box.

Final design changes in Adobe Illustrator
A lot of waiting had to be done as there was a long queue of people trying to cut their boxes, so come time to cut, I hoped all would go smooth.The settings set for the engrave were once again 80% speed at 15% power, and a test cut confirmed that 15% speed at 100% power would cut through the wood completely.
The same issue of not having separate cuts persisted, and this time, another issue occurred that the laser would not activate at all when going over the engraves or cuts. The solution this time was keeping the cuts a uniform color in Adobe Illustrator for the initial engraves, and then after removing images, changing the vector cut to red with stroke 0.072 pt. A very tedious process, but it managed to work in the end.

Final engravings

Laser cutting

Final cut box sides
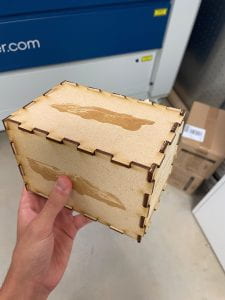
The cut was successful in the end, and the box was assembled. Once again, the edges were a bit inconsistent due to the kerf setting of 0.005, with some sides press-fitting and others needing a rubber mallet to press fit.
However, a fully assembled box was created with no adhesives needed!


PHASE 5: Reflection and cost estimate
Entering this project, I believed that it would not be the most complex project in regards to the actual prototyping. From past experiences, the laser cutter seemed to be intuitive to use. However, it was not good to underestimate the amount of work, prototyping, and problem solving that would have to go in to produce the box. In the end though, it was a rewarding experience that led me to get a lot more familiar with the Epilog Fusion Pro.
If I were to repeat this project, I would certainly be more material conscious as not not have to use too much scrap when prototyping or testing aspects of the design. It was not one of my best moments losing a considerable amount of space due to my mistake in setting up a stroke, so I will make sure to be very careful in setting up cuts as to not risk losing time and material again. Furthermore, smaller cuts could have also been made to save material too.
As for the box itself, I would try to use a better estimated kerf as to have all edged be completely press-fit rather than some being press-fit and others too tight. I would also like to attempt to use the masking tape method to reduce burns on the sides, but it would have to take some bug fixing to have the cut work with the files I make.
The following is an estimated cost of the box:
- 1/4″ 2ft x 4ft plywood panel (Home Depot): $20.99 x 2 = $41.98
- 1/4″ 2ft x 2ft plywood panel (Home Depot): $7.28
- Overhead/Service cost for Laser Cutter (LaserHints): $1 x 480 minutes = $480
- Labor: $20/hr (national average for a laser cutting operator by ZipRecruiter) x 8 hours = $180
The estimated cost of my box is $709.26. To lower the cost of the box, more efficient use of time would reduce labor costs and overhead/operational costs of the laser cutter, which were the two major cost factors in the creation of the box. More could have been saved with efficient use of materials.
