
The first design!
This week’s tool we explored was the waterjet cutter. I had quite the artists block this week, so I turned to my tried and true idea of something Earth or animal related. After scrolling through svg files on the Noun Project, I found a tree file that I liked a lot. This led to an evolution in my design by combining the ideas to have both an animal and an element of the Earth.
Failed cut. The metal between the leaves and branch was too thin and it broke.
My original idea was to cut the whole thing on the waterjet cutter, but after attempting to cut it out, the waterjet cutter disconnected from the computer after 18 of the 20 minute cut. While this was frustrating, I persevered and edited my design slightly to not cut the deer. I had the idea to cut a vinyl stencil of the deer and sandblast the area to leave a shadowy figure behind. After attempting this cut and it failing because the computer disconnected again, I hypothesized that it was due to the smaller pieces and the machine having to start and stop often, so I scrapped the idea to add a deer and just cut a file with a bigger tree and less leaves. Once again, the cut failed because the leaves were too close to the trunk and the branch fell out, I decided to go back to my original idea with the tree and deer, but to just waterjet cut the tree trunk and sandblast the leaves and the deer.

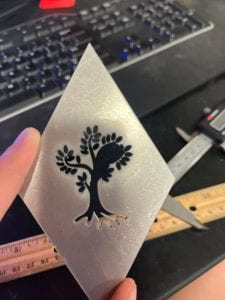
Final Design post waterjet cut!
Once I cut the tree trunk, sanded the piece in one direction with 400 grit sandpaper in one direction to add a brushed metal look. I made sure to sand the edges to take off the little bit of dross that was left over from the cutting process. After that I spent a little time adapting my first waterjet file for the vinyl cutter.

The vinyl stencil after weeding out all of the leaves and the deer

The diamond after sanding in one direction with 400 grit sandpaper
To do this, I removed the trunk from the tree and drew a shape around the cut that would cover the whole diamond. Once this was done and cut out I spent some time weeding the vinyl with an exacto knife and then stuck it to the correct place on the diamond. Then I headed off to the sandblaster and then my diamond was done! I was so happy with the way they turned out. The final product reminds me of Harry Potter’s patronus. As a final touch, I vinyl cut out my name and made another stencil for the back of my diamond.

The back of the finished diamonds

The finished diamonds!
Cost Analysis:
Material costs:
25 square inches of OEDK stocked 16 gauge aluminum – ~$19 for a 12″x12″ sheet of aluminum from Home Depot so $3.30 for what I used
(20 square inches for each diamond and 5 square inches from offcuts)
Total (material cost) – $2.32
Labor costs:
I spent half an hour finding files on the noun project and compiling them in illustrator, 4 hours operating and troubleshooting the waterjet cutter. If you assume an average salary for a metalworker and machine operator of $13.67, These diamonds cost $61.52 in labor.
Total: This crate costs $63.84.
