Kirby Chess Piece
Created by Yimo & Cassey
Our final project for building the chess piece is a journey of exploration and creativity in fabrication techniques.
Project Concept and Selection:
Our project began with selecting the chess piece design. After thorough consideration, we first chose the main character, wanderer, from Journey, a game. We were drawn to the size and shape of the character, regarding personal interest in this game.
Credit for wanderer model: link
We modified the model to make it fit into the size of the chess piece, as the right one in the image shown. Then we 3D printed it out(and it broke). Finally, it was proved that the model we downloaded online could not be appropriately cut and filled out in Meshmixer. Since we cannot move to the next step with this model, we instantly chose to change our selection to Kirby instead.
Credit for Kirby model: link
Execution of Part:
First, we needed to create 2 positive molds; one was 3D-printed, and the other was wooden and created by CNC machine.
3D Printing
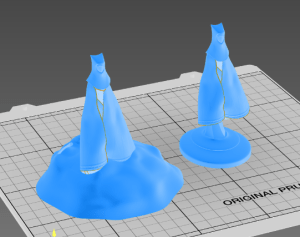
As we did with the previous model, we modified Kirby into several versions and 3D-printed them. Finally, we decided to remove the base and print out Kirby only. Then, we used Meshmixer and cut Kirby in half, following Rafe’s instructions. The picture below shows that the front half was added to a mold base and 3D-printed.
Different versions of Kirby

The slicing software window for 3D printing
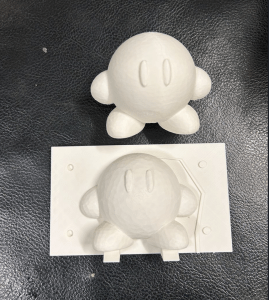
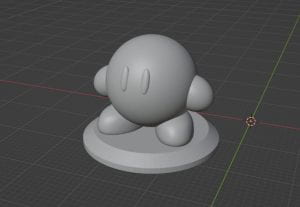
The 3D-printed piece of Kirby and the positive mold
CNC Machining
For the Back half, we similarly add it to a mold base and use a CNC machine to cut it out. After measuring the size of our wood piece, we use specific software to create the cutting paths; one is rough cut, which cuts the overall shape, and the other is smooth cut, which smoothens the shape’s surface. We were challenged in this step because we were unfamiliar with using the CNC machine, and it wasted some of our time, but we finally overcame it and got our piece cut.
After cutting it out, we used sandpaper to sand the surface of the wood to make it smoother.
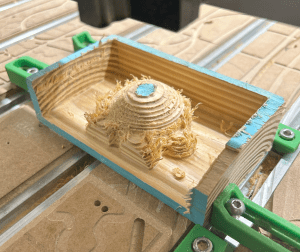
Rough Cutting
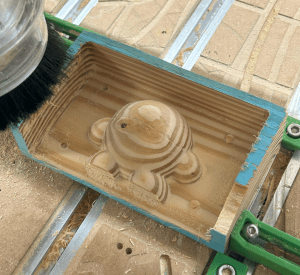
Smooth Cutting
Molding
In this step, we use 2 positive molds created by 3D printing and CNC machining to create 2 negative molds using silicon material. We use cardboard and hot glue to build edges around the positive molds and estimate the amount of silicone we need based on the volume of our mold in Solidworks. Then, we pour the mixed silicon about 1cm above the positive mold and wait until it solidifies. After a few hours, we can get a well-shaped negative mold.
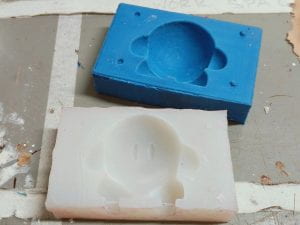
2 negative molds
Casting
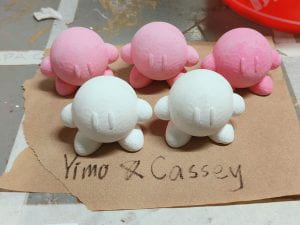
In this step, we used casting resin to repeatedly cast the chess pieces from the molds. The iterative process demanded mixing materials, waiting until they solidified, removing the mold, and getting the piece. We repeated this process five times and got five pieces. We were instructed not to do eight pieces to save material because our piece is relatively large. We also mixed some color when casting to get pink Kirbys.

Post Processing
Then, we used sandpaper and some helpful wood tools to cut and smoothen the edges of Kirby and got 5 Kirby chess pieces.
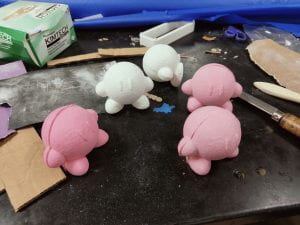
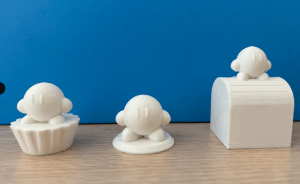
Finish!
Cost Estimation:
Labor:
$15/hr * 22hrs = $330
Machining:
3D printing: $134.99/month * 1/120 = $1.1
CNC machining: $1968/month * 1/120 = $16.4
Material:
silicone: $52.97 * 1/10 = 5.3
casting resin: $139.4* 1/10 = $13.9
Wood: $3
Overall:
$369.7
