This week’s project is to build a press fit display for our future projects. My first instinct was to build a flat wide box with no lid. So I started with creating rectangles representing the area each project needs, and moving them around to find a nice arrangement.
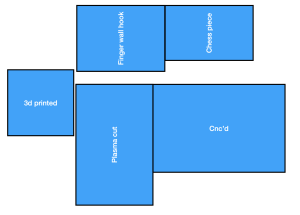
I first made some rectangles that are to scale of the areas given in the assignment file.
My first thought of how to arrange the blocks. The turquoise parts are the areas slightly bigger than the given areas
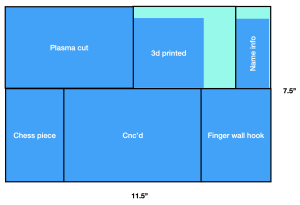
However, I felt like 7.5” by 11.5” takes up too much area, especially since I envision this sitting in my room (on my desk or drawer) in the future, I would prefer it not take up so much space. So I then decided to build upwards and stack things up.
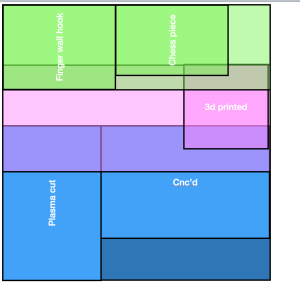
A rough concept arrangement of the areas and where to store the pieces. Green is the top layer, pink is the middle and blue is the bottom.
After getting a rough idea of how to arrange the projects, I went on to make a slightly more detailed design.
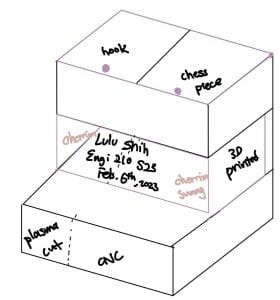
Made a more detailed sketch of what the project would look like and labelled where each future project will be placed. The purple lines indicated this piece will be made of clear acrylic.
Since the assignment wanted a display instead of a storage, I want to make sure all 3 layers could be seen at the same time. So for the bottom layer I designed a drawer, and top would have a transparent flip-open lid. The middle layer would have a flip open door (kind of like a garage door) so the user can take the project out of the acrylic box in the middle easily for display. Then made a more detailed sketch.
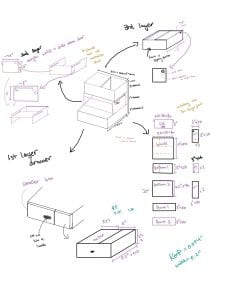
A more detailed sketch with zoom-ins on how each part will work and dimensions.
The design changed a little as I was building this project, which we will talk about along the way.
First thing I did was test out the kerf. I used the kerf found by my partner (0.004”) to first make the inside of the drawer. The inside drawer is just simply a divider box with with the divider slightly to the side.
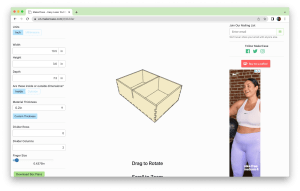
Using the Makercase website to make the drawer.
So I used the Makercase website to create a box with the write dimensions and a divider. Then in Illustrator, I manually shifted the slit for the divider to the side and added an ellipse in the front.
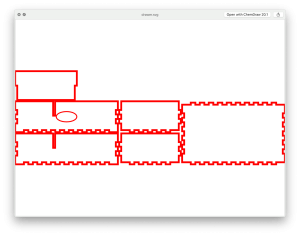
The edited illustrator file for the drawer.
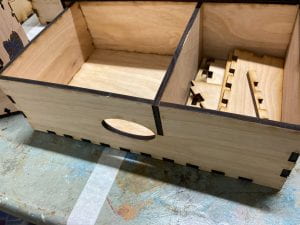
A photo of the completed drawer.
I decided that the width of 0.2” and kerf of 0.004” worked quite well, so I went on to use these numbers to build the rest of the shelf.
The wooden part of the shelf can be thought as two separate boxes. The box on top is a upright box with one divider, and the bottom part (the outer part of the drawer) is a sideway box with the top facing the front (I used the divider box setting without a divider because this setting gives a topless box and the top is flat so I don’t need to manually clear the finger joints on the top).
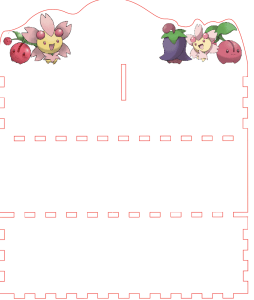
Then I went on to create the backboard, which is the most important piece of the project. First thing I did was connect the back-piece of the top part and the bottom-piece of the bottom part with a 3” tall rectangle. This is the main part of the back board. But then I decided, instead of having my name and info on the acrylic, I felt like engraving on acrylic doesn’t look as good as wood, so I made a headboard for this shelf. To continue the Pokemon theme, I decorated it with cherrim and cherubi photos on both sides, then roughly outlined it with the pen.
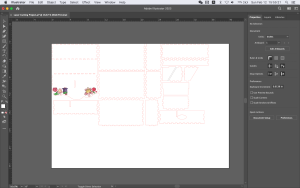
The backboard illustrator file. I added the text later because my laptop didn’t have the correct font that I wanted.
I then went on to print out all the other pieces first. (So that’s all the pieces in the photo below except the backboard and the drawer.)
The big compilation of all the pieces I needed to print. I didn’t print it all at once, and did some rearranging throughout the way.
In the photo above you might notice 3 pieces with a diagonal cut. This was an additional design added to the top layer to avoid the top from looking too bulky with the additional headboard. By this time, I also started noticing that I might not be able to find a big enough piece of acrylic to cut out everything I need, so I wanted to avoid the top being too heavy and can’t hold it’s place without additional support.
Before I printed the back board, I first tried different settings of engraving to see the effect.
Testing out the engraving effects on a cherrim and a cherubi. I was the most satisfied with this setting.
After making sure I like the engraving setting, I went on to print the backboard. Then I assembled everything.
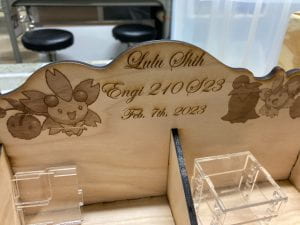
The engraved headboard. There is some charring around the words, but I think it’s ok and give a shadow effect.
I still wanted to build an acrylic part in the middle. Since all the other compartments are divided left-and-right, I wanted this middle part to have a horizontal divider. Since I don’t know the 3D printing project’s exact dimensions, I also want this divider to be adjustable.
First I wanted to make sure the same kerf still works for acrylic, so I built a simple testing cube.
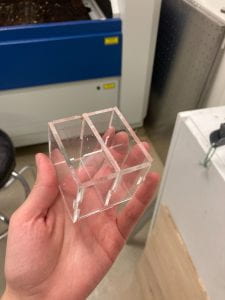
A simple one-divider acrylic box with kerf of 0.004”.
The box went pretty well, so I went onto use this kerf to build a proof of concept cube for my adjustable divider.
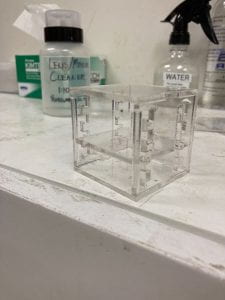
Proof-of-concept of the adjustable divider. I drew the patterns on each side of the box on Illustrator.
The proof-of-concept also went well, but I found it difficult to find a piece of scrap acrylic that was big enough (especially for the divider). So I’m settling with the current wooden design, and keeping an eye on the scrap pieces in the laser cutting room for any big piece of acrylic. I have the illustrator file ready so I’ll be able to print as soon as I find a suitable piece of acrylic.
So final project looks like this:

A photo of me holding my final shelf.
Cost Estimation:
~24” x 32” = ~$13
Acrylic: negligible
Labor:
~6 hours * $7.25/hour = $43.5
Total Cost:
$56.5
