Mechanical Movement 133
This story starts as Dr. Wettergreen reviews each of our mechanism choices for the midterm, in which we select one of the 507 Movements and render it in full laser-cut glory. He tells some students that their chosen mechanisms are too difficult or complicated, and most heed his warning. One student, full of pride and ambition, forges on ahead. As that student, I did not comprehend the hardships that lay in front of me, but likewise, I had not yet tasted the joy of victory that would eventually come. This is my struggle and my triumph.

Pictured: the struggle
Draw, Cut, Build

Every tooth of this gear has hundreds of tiny crash-inducing lines
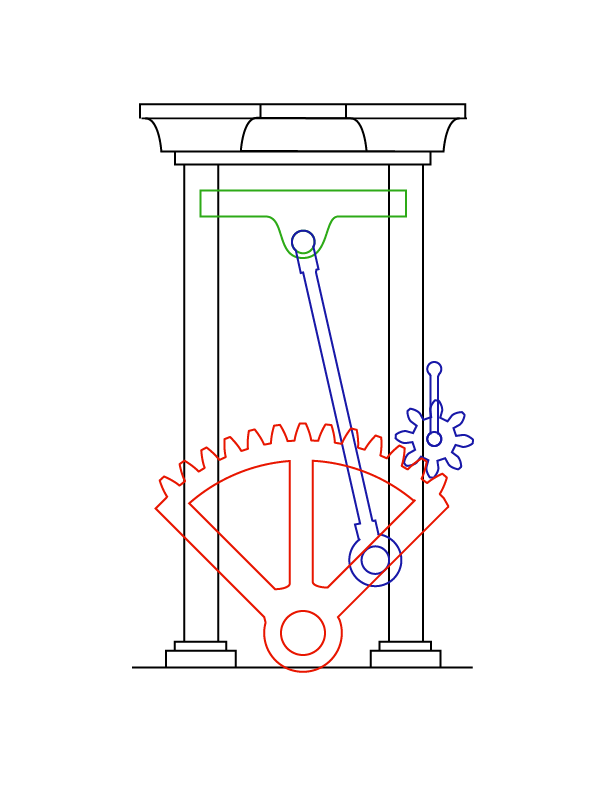
For the serial reader, I pick up here where I left off on my 2D drawing post, with Mechanical Movement 133. This machine features a crank that turns a smaller gear. This gear drives a larger 1/4 gear with a linkage that pushes another piece along a linear rail. This creates a linear elevator-like motion from a single crank.
To start, I decided to go big or go home, and create the assembly in Solidworks. I thought this would make my work down the road easier, as I’d have a better idea of how pieces fit together. The assembly flew together, except for one crucial piece, the gears. When importing gears from the recommended gear generator website, the dxf files are created as polyarcs, thousands of tiny lines in the shape of a gear.

The full CAD model featuring elevator doors I had to cut
This is BAD. I crashed Solidworks more times than I can count on one hand, only succeeding when I downscaled the gears in Illustrator first. After that struggle, however, the rest of the model flew together, and I began my first laser cut.
As predicted, the CAD model helped a lot with proper spacing of components. The gears on the first laser cut piece meshed well. What the model did not help with was tolerances. Holes were far too big, gaps led to pieces slipping, and general chaos was had. In addition, a nonessential feature I had wanted to add, doors that were pushed open when the moving part reached the top, had to be scrapped. Friction and general physics proved these impossible. I took the vector files back to the drawing board, tightening gaps and cutting again.
The Great War of Tolerances

Many, many pieces sacrificed their lives to find a decent tolerance for this project

Pictured: rounded corners attempt (fail) and three layer sandwich (success)
As I cut the second iteration, I also experimented far more with another devilish part of the design, the linear movement. I wasted a very large percentage of my time struggling with this seemingly simple part of the puzzle. In my design, there are four wooden rails spaced in a rectangle and a “floor” piece to travel between them. The floor piece has three layers, with the middle wider than the outers. In effect, the middle piece is sandwiched between layers of laser cut rails, while the outer pieces travel between rails on a single layer of wood. The problem arises with rotation. If the piece rotates even a tiny bit, the corner will catch, the piece will jam, and everything will be ruined. The only way to keep the floor piece from rotating is to reduce the gap between it and the rails, but go too far and friction also halts the machine. I tried many things, and almost everything failed or broke (Tragedy):
-

Despair reaches an all-time high as pieces break
Cutting many iterations at different sizes
- Sanding the edges to be the perfect tolerance
- Rounding the corners so they can’t possibly catch
- Increasing the number of layers of wood
- Increasing the surface area in contact with the rails
- Excessive sanding of everything
In the end, only the last two bullets were effective as eliminating jamming. Increasing the contact of rail and moving part allowed less relative rotation, which stopped things from catching. This was by far the most difficult part of the project, but it did work in the end.
Plasma Iteration

All of these have holes that are too big
For my metal piece, I wanted something highly integral to the design (why waste metal on a handle), but also a simple shape. I chose the linkage connecting the gear to the moving piece for a few reasons. First, its importance and simplicity. Second, it is a piece that is long and skinny, playing well into the strength of metal in long beams. Third, the metal can be bent, which allows me to adjust the linkage to be adjusted around components that would otherwise block it. I modified my wood linkage vector file to be thinner, and I created several files with different hole sizes to test tolerance.
When I cut these several linkages on the plasma cutter … none of them came close to fitting. In the end, it took 5 tries to get to a good hole tolerance on my metal piece. Once I had it, I used the angle grinder to remove burrs and the belt sander to clean up the surface. I quite like the surface finish that the belt sander leaves. I reminds me of expensive brushed metals.

Thank the bees for this beauty!
Final Touches
At this point, my machine was functional, which was far more than I expected at the darkest point of my journey. The next step was to make it classy. I took apart my handiwork and prepared for finishing. I sanded everything down as finely as my sandpaper would allow, then added a coat of mineral oil. I honestly don’t think this did anything to improve the surface of the wood, but I wanted to try. I then moved to a trusted technique, beeswax. When we added beeswax to our project over the summer, it improved the surface a ton, so that was my go-to here. To my surprise, after the beeswax was applied and removed, everything became MUCH better. Friction was almost completely eliminated, and the mechanical movement suddenly became very smooth. This is the redemption referred to in the title. After this success, I decided that this surface was the peak that I could achieve, and I quit while I was ahead. I glued everything that wasn’t friction fit with my favorite adhesive of all time, CA glue, and reflected on whether such a difficult project choice really was worth it.

Beautiful and mechanically sound!
