For our next project, we are working in Illustrator. I’m not really acquainted with Adobe Illustrator, but I suppose it is good to learn so that I can use the laser cutter in the future.
We were supposed to find a movement in 507 Movements and then trace it into Adobe Illustrator. If you couldn’t do that, because unfortunately the trace tool in Illustrator doesn’t like working sometimes, then we would have to create the design ourselves from scratch. Lucky for me, tracing wasn’t all that much of a problem. I chose movement 68 because I thought it looked simple enough to do, while still posing a challenge for a new user of Illustrator.
After selecting the image, I placed it into Illustrator, then Window > Image Trace, choose a Technical Drawing so I can get some semblance of the movement, and I got some thing I couldn’t really use. It was all bendy and the curves kind of went into each other in addition to random gaps in the drawing so I couldn’t even use the shape builder tool. I decided to approach it from a different angle, like using a different tracing algorithm online, but those turn out to cost money. I then found Inkscape.
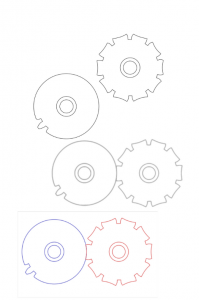
Inkscape is cool because it is essentially Adobe Illustrator-Lite. It lots of the tools Illustrator has and is completely free, unlike Adobe Illustrator. It can’t save .ai files, but it can save .svg files that can be opened in Illustrator. I tried using Inkscape because I wanted to try and recreate my movement from scratch on my computer without having to pay for the Adobe Creative Suite, but I found that it has its own image trace algorithm. As it turns out, it works out decently well. It basically makes multiple traces and then displays all of them on top of each other to make the path. This was really nice because it meant closed paths, and the drawing wasn’t as awkward to look at. After saving the new trace as a .svg file, I opened it up in Illustrator and used the shape builder tool on the two gears and got my final product!
The top is the final shape builder drawing, the middle is the Inkscape multi-layer drawing, and the bottom is the original image before image tracing. Perhaps there was an easier way to do this in Illustrator by adjusting the settings and whatnot, but this is the way I discovered and I think it worked out okay.


