The Beating Heart
Brainstorming and Low Fidelity Prototype
When brainstorming for this project, we knew we wanted to pursue something cardiac related because we are working on developing a cardiac medical device in another class. Eventually we landed on the idea of a beating heart. We wanted to mimic the heart’s physiological motion of pumping, where the atria pump first and the ventricles pump next providing the “lub dub” heartbeat sound. In Figure 1, we planned out the order of the mechanical movement. We were inspired by Grace’s Flower project which utilizes a cam and follower mechanism. Additionally, we wanted to incorporate a red and blue color scheme to represent blood circulation through the heart as seen in Figure 2.
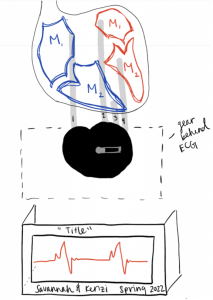
Figure 1
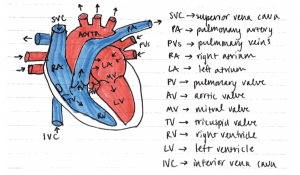
Figure 2
We developed a low fidelity prototype using cardboard, popsicle sticks, and super glue. We laser cut the heart shape and the chambers. This model was useful to test the cam and follower mechanism.
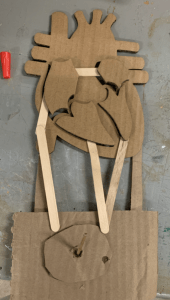
Figure 3
Medium Fidelity Prototype
For our next iteration, we laser cut a cardboard box for the base using makercase.com. We used the back face of the box to create a testing mechanism for the cam wheel. We attached slots to hold the atria and ventricles attached to the followers. Using this model, we were able to take measurements for our final prototype. We decided to increase the height of the heart and the box. After creating this model, we also decided we wanted to cut the shape of the heart in one piece without holes from the chambers.
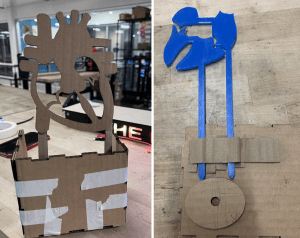
Figures 4 & 5. Cardboard medium fidelity model
High Fidelity Prototype
We produced a final prototype with the heart, chambers, stilts, and followers made of clear acrylic. By using the acrylic, we achieved the aesthetic we wanted without harsh wood components taking away from the heart. We used the vinyl cutter to cut stickers for the various parts of the heart.
The base of the model displays an ECG, or the electrical demonstration associated with the heartbeat. We laser cut the box out of ⅛” plywood and included slots in the bottom side for the acrylic stilts holding the heart. We kept the box open, so that you can easily access and turn the cam wheel from the back of the model.
Next, we had to create the components for the cam and follower mechanism using plywood. We laser cut a rectangle for the slits and a rectangle for the cam wheel. On this first rectangle we attached small laser cut pieces of wood using wood glue. We measured the width of the followers to ensure accurate placement of the slot pieces. Next, we glued this rectangle slot-faced down to the back of the front face of the box. For the cam rectangle, we laser cut a hole through the middle and glued in a wooden dowel. Next, we placed the cam wheel on top of the dowel and glued a topper to the dowel to ensure streamline movement of the cam wheel and make sure the wheel and followers were on the same vertical plane.
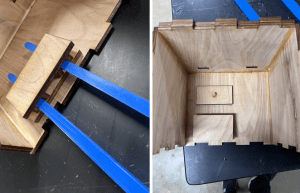
Figure 6 & 7. Cam rectangle and slots for holding the followers.
We took a strategy to plan out the location of the followers then decide on the dimensions of the cam wheel to get the desired motion. We tested multiple sizes of the cam wheel and ultimately ended up using a wheel that was a 2.5” x 2.3” ellipse. Then, we used wood glue to attach 4 small knobs to turn the wheel from the back of the box. The hole of the cam wheel was set onto the wooden dowel in the cam rectangle.

Figure 8. Examples of cam wheels used to test the lub-dub motion
We used red and blue vinyl stickers to indicate the oxygenated and deoxygenated blood flow in the vessels and the heart chambers. The septum/heart tissue is shown in a pink vinyl sticker.
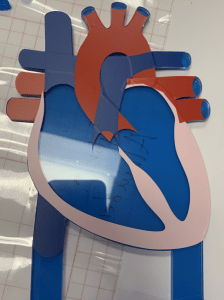
Figure 9. Vinyl stickers applied to acrylic heart model
As a final step, we needed to secure the cam wheel but keep it free to move. We placed a layer of painter’s tape onto the cam wheel and wood glued a small circle to the outer part of the dowel. The painter’s tape kept the glue from accidentally fixing the cam wheel to the dowel. Then, we secured the heart stilts into the base and let it sit overnight.
Overall, we are very proud of our unique idea, and the feedback we received in class was aligned with what we thought we could improve as well.
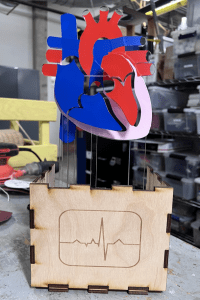
Figure 10. Final Mechanical Model: The Beating Heart, front view.
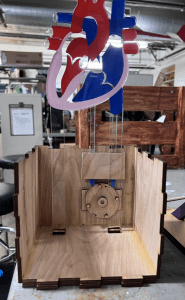
Figure 11. Final Mechanical Model: The Beating Heart, back view.
Final Thoughts
There are a couple things we would do differently now that we have completed our project. First, we would have made the box without fingers for attachment so that the top edges of the box were smooth. Additionally, we would adjust the svg file for the vinyl to be slightly scaled down. In our final model the stickers were slightly larger than needed causing minor overlap to the sides of the pieces. We believe this is due to the kerf from laser cutting the acrylic. Lastly, the knobs to turn the mechanism were pretty small, and it was somewhat difficult to reach them because of the acrylic stilts holding the heart. If we were to do this again, we would consider redesigning the stilts in a different way so that we could reach the cam wheel knobs more easily.
Cost Analysis
- (1) Cardboard box – $1.50/box
- (½) ⅛” Plywood – $6/sheet
- (1) ⅛” Acrylic – $10/sheet
- (3) Vinyl stickers – $1.79/sheet
- (¼) Contact paper – $4.49/roll
- (42) Labor – $20/hour
We used miscellaneous supplies available at the OEDK that we did not include in the overall cost, such as hand saws (to cut dowel to size), sand paper (to remove pencil marks on plywood), wood glue, foam paint brushes (to apply wood glue), calipers, paper towels, rulers, and painters tape. We found a scrap piece of a dowel for our cam wheel, so that cost was also not included in this calculation. Since we have access to the laser cutter and the vinyl cutter, we did not include this cost in our calculation. However, we estimate that our total cutting time was about 1 hour (excluding file prep, machine setup, wait times, etc.). With that, our total estimated cost is $860.99 ($20.99 for materials, $840 for labor).
