To accomplish this assignment, we had to cut out two identical Rice War Owls. However, before we could do that, we had to start by learning how to use the laser cutter. Learning how to use most machines can be a tedious process. Learning how to use the laser cutter though, was a lot of fun. When Logan and I went in during our designated time to learn how to use the laser cutter we played around with it and made several cutouts that I thought were pretty cool. The first piece we made was the state of Texas. This was not too extraordinary but it got our hands wet in the world of laser cutting. We were just trying to figure out how to make a cut so we did not do any etching and as a result had a pretty bland state of Texas. Logan did most of the work for this piece, so for the next piece we made I created the file and executed the cut.

Image 1: Outline of US
I did not want to make the state of Texas again since that was what Logan did, so instead I decided to cutout the entire United States. To do this I found an outline of the United States online without any of the state lines in it. I then used image trace to convert it to a vector image and cleaned it up so that it would be able to be laser cut. However, when I was sitting there looking at the outline of the United States I though it would be way cooler if it had a cutout in it. My first thought was to cutout Pennsylvania because that’s my home state. The issue with cutting out Pennsylvania, though, is that the amount of wood to the right of Pennsylvania would be so thin that it could easily break. Instead, I decided to cutout Texas. To accomplish this, I took the file of Texas that Logan had made for his cutout of Texas and placed it on top of my outline of the United States. I then resized Texas to the size of my outline of the United States and sent the cut to the laser cutter. The result (or should I say work of art) can be seen to the right.

Image 2: Cutout of US with Texas also Cutout
Not only does the United States look cool, I also now have a cutout of Texas if I ever need one.

Image 3: Cutout of Texas

Image 4: War Owl
After I cutout the United States, Logan and I still had about an hour and a half left on the laser cutter so we decided to try our hand at cutting out the war owl. We went on to Canvas and loaded the war owl file into Illustrator. We then did not alter the image and all to see what would happen if we printed it as is. We only altered the print settings to color the map the war owl. The result was a pretty good looking war owl, not perfect, but pretty good. The only issue was that because we did not alter the owl in any way, the edge stroke was not set to 0.001 inches so the piece did not cutout. We first tried to remedy this by setting the stroke to 0.001 inches. However, that set the stroke of everything to 0.001 inches which would have caused all the shapes inside the owl to be cutout.
To fix this issue, we deleted everything inside the war owl so that we were left with only the outside edge. We then set the stroke of this to 0.001 inches and sent the file to the printer. The file was the same size as the war owl we etched and in the same location so as a result it cutout the war owl.
After printing out the one war owl we still had a little over an hour left so we decided we wanted to make something really cool. After carefully deliberating and brainstorming we decided to make a puzzle of all of the states in the United States. To do this, we found a map of the United States online with all of the state boundaries in it. We then used image trace to convert it to a vector image file and cleaned it up by getting rid of all of the islands and small lakes (like the Great Salt Lake. We left the Great Lakes). We then put a rectangle around the outline of the United States so to create a board that our puzzle could be placed in. We also made cutout another rectangle of the same size as a backing for our puzzle. We then set all of the strokes equal to 0.001 inches and sent it to the printer. The file took about twenty minutes to cut because the laser cutter kept going over cuts that it had already made. However, after the twenty minutes we were left with an awesome puzzle of the United States. After that we left for the day.

Image 5: US Puzzle
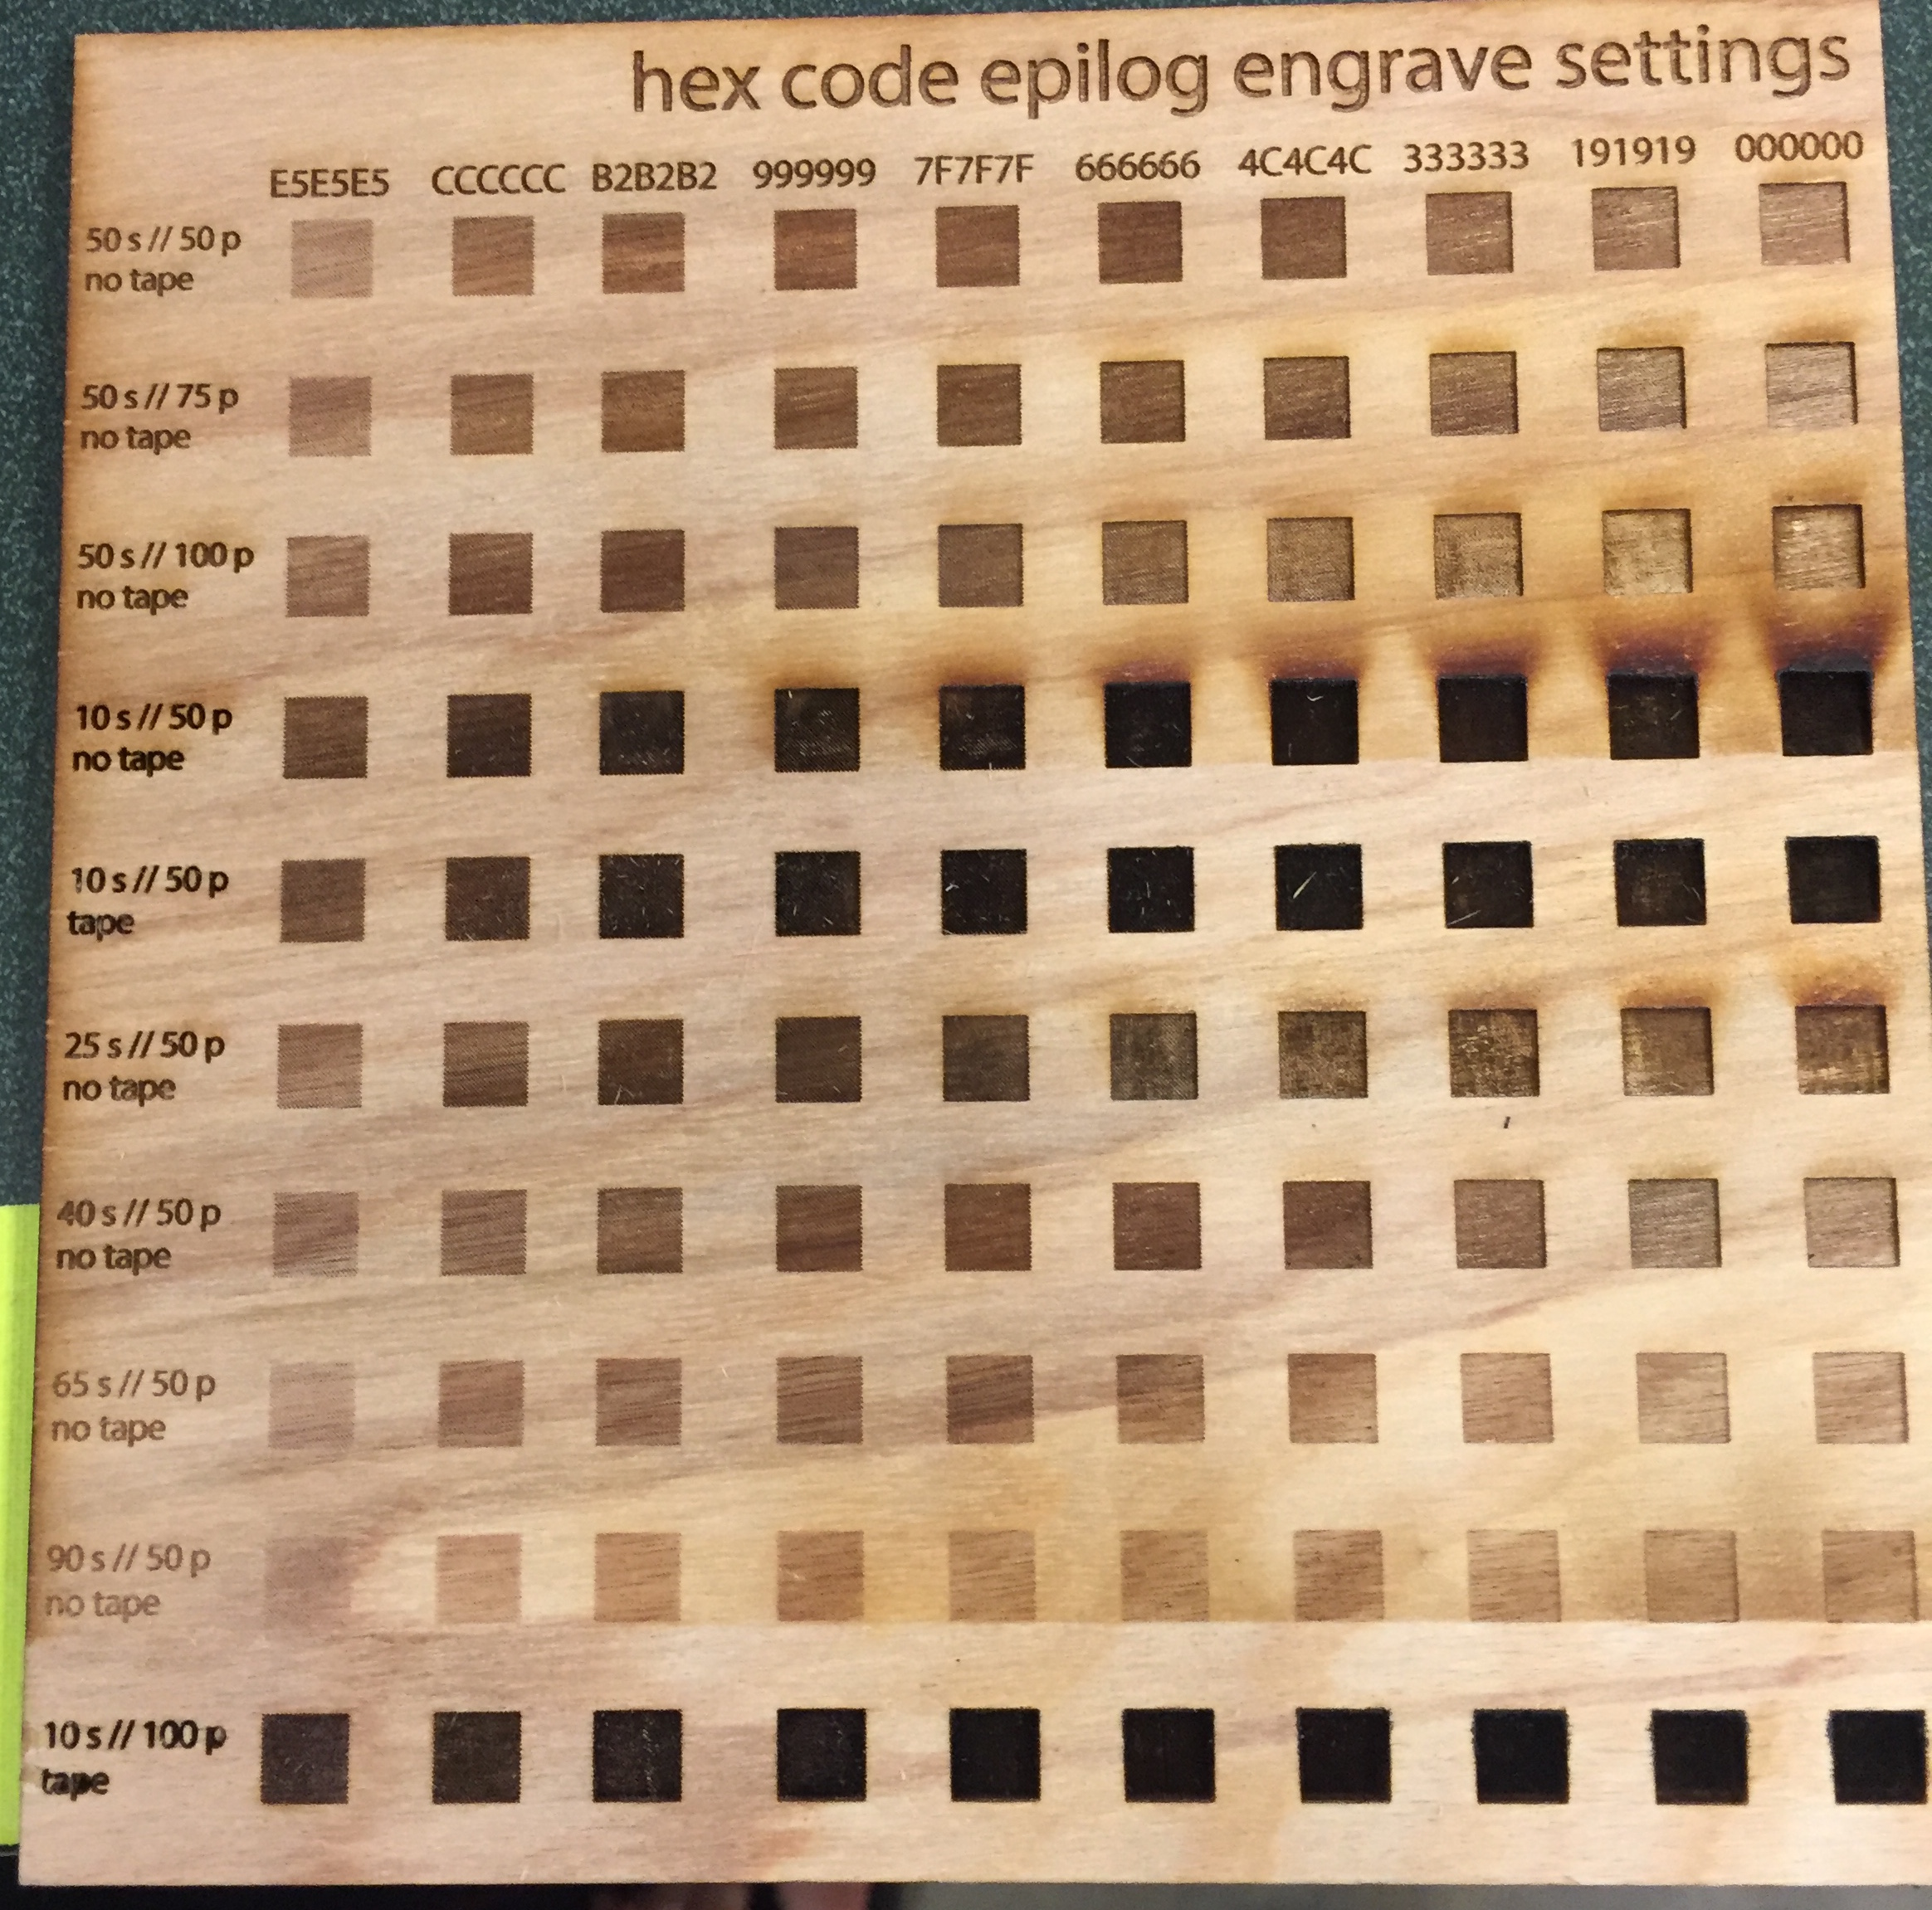
Image 6: Hex Code Epilog Engrave Settings
Fast forward a week. Now we are back in the laser cutter room. This time with four other people in ENGI 210 who are also clamoring to cut out their perfect war owls. Everyone’s war owls were taking forever to cut (some people took fifteen minutes to cut one war owl). While we were waiting in line for our turn to use the laser cutter we were trying to figure out a way to cut the war owl faster and more efficiently. Everyone else was doing what we did the first time, which was to use color mapping to etch their war owl. The problem with this is that the laser cutter will go over the entire owl for each color it needs to etch. This causes the cutting time to be longer. As we were sitting there, Mikaela, the lab tech (and also my o-week advisor) came over and told us that we did not have to color mapping at all. The laser cutter would etch different amounts depending on what color the owl was. We used this chart below to determine what the colors would look like. As a result, all Logan and I did was change the colors of the owl to different shades of gray using the chart in the laser cutter room. I did not make my war owls the same as Logan’s because we have different views of perfection. Below is the owl I made in Illustrator.

Image 7: War Owl in Illustrator

Image 8: War Owl Outline in Illustrator
We then sent the cut to the laser cutter, which beautifully etched our perfect war owls. Due to not using color mapping, our four owls took fifteen minutes to cut total, instead of fifteen minutes for each one. Like the first time we cut the war owl a week prior, we used a second file to cutout the owls. The file is shown below. The outline is very faint because the stroke is 0.001 inches.
We know there is a way to do the etch and cutout at the same time, but when we tried to do that we kept on messing up our war owls so we decided to do what we already knew worked. Finally, we had the perfect war owl!

Image 9: Perfect War Owl!
